Introduction
Foundation covers the core principles behind calisthenics training. Think of it as the theoretical part of the course, where each video explains a concept rather than a particular exercise or workout.
You don't need to know all of this before you start training. For quick, practical answers, check the FAQ.
Overview
This section covers these topics:
- Programming - how to structure your own program: training cycles, movement patterns, and warming up.
- Progression - how to keep progressing through harder exercises.
- Technique - how to move well within each rep, including tension, breathing, and bracing.
- Recovery - how hard you trained, how fatigue builds, and how much rest you need.
- Tracking - how to log your workouts and see your progress.
- Mobility - how to improve your range of motion and movement quality.
- Weight loss - how training and diet fit together for fat loss.
- Equipment - what equipment is useful and how it affects your training.
- FAQ - common questions about applying these principles to your own training.
Calisthenics as an RPG game
You can think of calisthenics as an RPG game where you are the main character.
The analogy fits well, because to improve you first need to assess your current level.
- "How many pull-ups can I do?"
- "Do I have pain in my wrists?"
- "Do I have any muscle imbalances?"
- "Do I have previous injuries?"
- and many more
These questions matter because they decide how you should approach your training. Ignore them, and your injury risk goes up while your progress slows down.
Programming
A lot goes into designing a good program, but you do not need to know everything up front.
I only knew a handful of these things when I started, and it did not stop me from training. You learn as you go. Still, it helps to be aware of these concepts.
Periodisation
Periodisation is a method of organising a training program into planned phases. The modern periodisation model was formalised by Soviet sports scientist Lev Matveyev, who divided training into three main types of cycles:
- Macrocycle - the complete long-term training plan. It commonly lasts from a few months to 2+ years and is designed around a major overall goal, such as building muscle, improving strength, or preparing for a competition.
- Mesocycle - a specific training phase within the macrocycle. It usually lasts around three to eight weeks and focuses on a particular objective, such as hypertrophy, maximal strength, muscular endurance, or recovery.
- Microcycle - the shortest training cycle. It commonly lasts one week and contains the individual training sessions, exercises, volume, intensity, and recovery days.
Application to calisthenics
I already mentioned three stages in the course: preparation, basics, advanced which we can think of as macrocycles.
Each one of them has a long-term goal, as explained in the stages section.
Why so many options?
The problem with programming is that the deeper you go into cycles, the more individual factors matter.
A 60-year-old with wrist pain and no background in fitness will have a totally different program than a 25-year-old with 5 years of lifting experience.
Movement patterns
A movement pattern is a basic way your body moves, like pushing something away, pulling it towards you, or squatting down. Most exercises are variations of just a few patterns.
When you build a training program, it's important to cover all of them. If you train only some, your program becomes unbalanced. You'll leave gaps in your strength, your progress in other skills may stall, and in some cases this might lead to injuries.
There are exceptions
This doesn't mean you can never focus on one area.
For example, you can train legs for a couple of months. Just make sure you bring the other patterns back in at some point.
Four patterns
Strength coaches use many movement patterns, like vertical push, horizontal push, squat, hinge, lunge, carry and so on.
For simplicity, this course groups them into four categories:
- Push - covers any movement where you press away from your body, either forward, like push-ups, or overhead, like handstand push-ups. It mainly trains your chest, shoulders and triceps.
- Pull - covers any movement where you pull towards your body, either from above, like pull-ups, or from the front, like rows. It mainly trains your back, rear shoulders and biceps.
- Legs - covers squatting, hinging and single-leg work, like pistol squats, deadlifts and lunges. Running, jumping and sprinting count here too.
- Core - covers movements where your trunk either moves or resists movement. That includes compression, like L-sits, and holding a straight body, like planks and hollow holds.
Balance push and pull
Most people push more than they pull. A simple rule is to do at least as many pull sets as push sets each week.
Some exercises train more than one pattern. A muscle-up, for example, is a pull followed by a push. In that case, count it for both.
How to warm up?
A warm-up prepares your body for training and helps you move well from the first rep.
A common mistake is overcomplicating it: doing random exercises or turning it into a full workout.
Keep it simple, around 5 to 10 minutes, focused on the joints and movements you are about to use. It should not be hard or long, just enough to prepare your body.
Warm up what you train
And yes - if you plan to train full body, warm up the full body.
Progression
The biggest mistake in calisthenics is repeating the same workout every session. If nothing changes, you will not progress.
There are several layers of progression:
- Master technique - improving the quality and efficiency of how you move, including everything that happens within a single rep.
- Develop the movement - changing the movement itself through different rep types, range of motion, assistance, leverage, resistance, or mechanical difficulty.
- Increase volume - increasing the total training demand through reps, sets, hold time, rest periods, density, frequency, and workload.
- Unlock skills - moving into a different exercise or a more advanced skill variation.
Always make some progress
In each session, improve at least one variable, whether it is technique, rep count, hold time, or any other.
Overtraining
If you have not progressed for 2 sessions in a row, or you are consistently regressing, it usually means your recovery, fatigue management, or progression strategy needs adjusting.
Progression decision flowchart
This diagram shows the best way to progress when learning a new calisthenics skill.
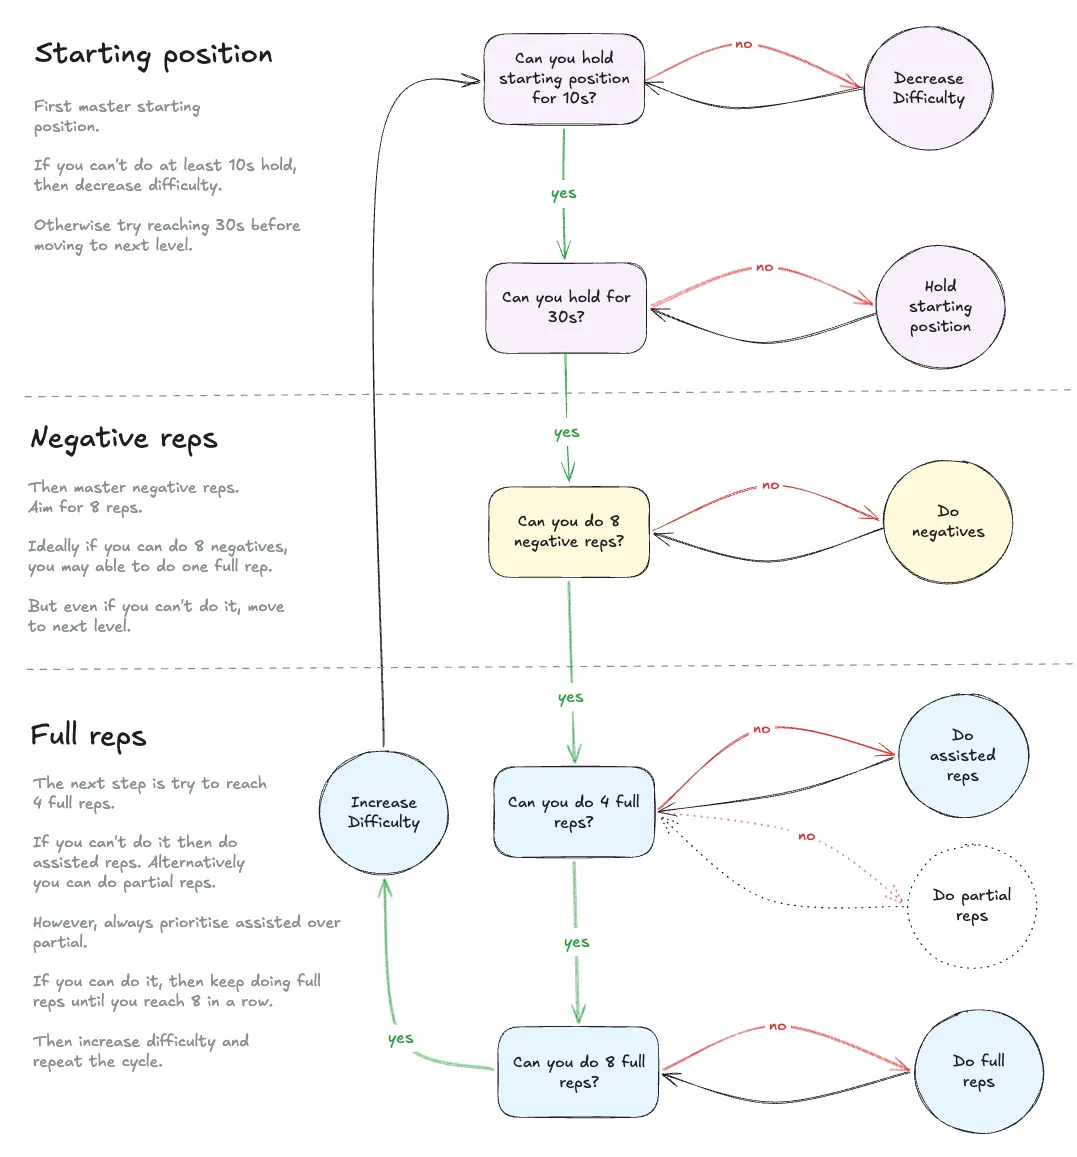
Develop the movement
There are a few ways to keep developing a movement:
- Master the starting position - this is a critical step.
- Partial reps - add measurable partial reps.
- Negatives - increase range of motion through a full, slow lowering phase.
- Assisted reps - add assistance so you can move through the full range.
- Normal reps - as it sounds.
- Deficit reps - increase the range of motion even further.
The video does not mention it, but you can keep progressing with:
- Advanced reps - increase difficulty by adding resistance, changing leverage, changing the distance between your arms or legs, or adjusting other variables once standard reps are no longer challenging.
Increase volume
Progressive overload means gradually increasing the demand placed on your body over time.
Prefer low volume and high intensity
Aim for around 4 to 8 reps at roughly high intensity, or about 1 to 3 reps short of failure. Once you reach 8 clean reps, increase the difficulty.
For isometric strength exercises, aim for 10 to 30 second holds.
While for lower intensity mobility exercises, aim for 30 to 60 second holds.
You can also keep progressing by adding sets or reducing rest time.
Unlock skills
Increasing difficulty means modifying the same movement through leverage, resistance, range of motion, or position changes.
Unlocking a skill means progressing into a movement treated as a separate exercise, such as the handstand or front lever.
Technique
Before adding reps, you can make any rep harder by improving technique, which includes:
- Position - how your joints and limbs are arranged relative to each other.
- Alignment - how your body is oriented relative to gravity and force.
- Range of motion (ROM) - how much of the movement you complete.
- Tempo - the speed and timing of each phase.
- Movement path - the route your body or limbs follow.
- Tension - keeping full-body force transfer and stability.
- Bracing and breathing - creating core stability while coordinating your breathing during exercise.
- Focus - directing attention to improve execution and coordination.
Don't chase reps
Do not chase rep count. Master the technique instead.
Position
Position refers to how your joints and limbs are arranged relative to each other during an exercise.
Unlike general techniques such as bracing and breathing, positioning depends on the exercise and your goal.
Position comes first
Before increasing difficulty, master your position. Even small adjustments can make a significant difference.
While positioning varies between exercises, some techniques apply to many movements.
One of them is overcoming isometrics, which involves generating force without movement.
Overcoming isometrics
You've probably heard coaching cues such as "Screw your hands into the floor" or "Break the bar".
These cues describe a way of deliberately generating muscular force without changing your position.
For example, you can apply this technique during:
- Planks or push-ups - try to rotate your hands against the floor.
- Pull-ups - try to bend the bar.
- Squats - rotate your feet outward against the floor.
- Middle splits - try to pull your feet together.
- Bench or overhead press - apply torque to the bar to improve stability.
Don't overdo it
Excessive force can cause unwanted muscle compensation and increase joint stress.
Use only as much force as needed.
Tension
During an exercise, different muscles can produce very different amounts of tension.
In sports science, muscle force can be expressed relative to MVC (Maximum Voluntary Contraction). It basically means the hardest you can voluntarily contract a muscle.
Tension applies to individual muscles. During the same exercise, one muscle may only be engaged while another is squeezed.
What is a tension heatmap?
A tension heatmap shows the tension level of each muscle during an exercise, making it easy to see which muscles are working lightly, moderately, or strongly.
3 Levels of tension
You cannot accurately estimate MVC just by feel, so for this course I use a simpler coaching model.
| Level | MVC | What it feels like | Examples |
|---|---|---|---|
| Activation | <30% | Light tension. The muscle is active, either naturally or deliberately, but you are not contracting it hard. | Handstand balance practice, setting your rotator cuff before pressing |
| Engagement | 30‑60% | Moderate, deliberate tension. The muscle feels clearly firm, but the contraction is still easy to maintain. | Active hang, a plank, engaging your lats before a pull-up |
| Squeeze | 60‑100% | Strong voluntary contraction, from hard to near-maximal. You are deliberately trying to make the muscle very tense. | Strength-focused plank, hollow body hold, the last rep of a hard set |
Why these names?
I derived these names from the way tension is commonly described in the fitness industry, using cues such as "activate your glutes", "engage your core", or "squeeze your abs".
Activation
Activation means the muscle is active with low tension. The contraction may happen naturally during movement or be created deliberately, but it remains light.
Examples:
- Lightly brace your abs before easy push-up.
- Gently squeeze your glutes before a squat.
- Set your rotator cuff before pressing.
- Create light lat tension before starting a pull-up.
- Tighten your quads before straightening the knee.
- Lightly tense the muscles around your hip before balancing on one leg.
Use only as much tension as you need
Activation is useful when you only need enough tension to maintain a position.
For balance, endurance and technique practice, excessive tension can make movement harder and create unnecessary fatigue.
Engagement
Engagement means deliberately contracting the muscle with a moderate amount of tension.
The muscle should feel clearly active and firm, but the contraction should still be relatively easy to maintain.
Examples:
- Keep your shoulders and back active during an active hang.
- Keep serratus tension during a wall slide.
- Brace your trunk before hard push-ups.
- Keep your glutes firm to maintain hip position.
- Maintain moderate tension through your abs and obliques during a plank.
- Engage your lats before initiating a pull-up.
- Keep your shoulders elevated and stable during a handstand.
- Tighten your quads to keep your knees locked in an L-sit.
This is the most common level
When this course tells you to engage a muscle, deliberately create tension without contracting it as hard as you can.
Squeeze
Squeeze means deliberately creating strong muscular tension.
You are actively trying to make the muscle very tense, ranging from a strong contraction to near-maximal effort.
Examples:
- Squeeze your abs hard during a strength-focused plank.
- Maintain strong abdominal tension in a hollow body hold.
- Brace hard during a heavy squat or deadlift.
- Drive your quads hard during a difficult squat.
- Squeeze your glutes strongly at the top of a bridge or hip extension.
- Pull hard through your back during a near-maximal pull-up.
- Produce near-maximal tension during the final rep of a hard set or the end of a maximal hold.
Use squeeze when you need maximum stability or force
The harder the exercise becomes, the stronger your squeeze may need to be.
During maximal effort or when approaching failure, tension may naturally approach your maximum.
How much tension do you need?
The right amount depends on the exercise, the muscle and your goal.
Choose tension based on your goal
For balance, endurance or technique, stay mostly around activation to engagement.
For strength and stability, use engagement to squeeze in the muscles that need to produce force or maintain position.
For example, during handstand balance training, excessive tension can make balancing harder and create unnecessary fatigue.
During a wall handstand hold for strength, deliberately squeezing the relevant muscles can make the position more demanding.
Bracing & Breathing
Of all the techniques I've had to learn, bracing and breathing were among the most difficult.
Bracing vs Breathing
Bracing means creating tension in your trunk muscles to stabilise your spine.
Breathing means managing your breath while maintaining that stability.
Basic brace
The basic brace is the foundation of bracing, regardless of the exercise or how much tension you need.
To create one, follow these three steps:
Once you understand the basic brace, you can learn how to apply it during different exercises.
Step 1: Find spinal position
Before bracing, get into the spinal position required by the exercise.
For many strength exercises, this means a neutral spine. Others, like hollow body holds, Jefferson curls and back bridges, require different positions.
Learn to control your spine
Practise recognising and controlling neutral, flexed and extended spinal positions.
Step 2: Take a breath
There are several ways to breathe, including chest, belly and 360 breathing.
For bracing, especially during the Valsalva manoeuvre, 360 breathing is generally preferred.
It encourages your abdomen and lower ribcage to expand in all directions, helping you create a stable brace.
Not every brace needs 360 breathing
For easier exercises, breathe naturally as long as you maintain stability.
For demanding lifts, take a preparatory breath before creating a stronger brace.
Step 3: Create core tension
Creating tension around your trunk is the main part of bracing.
Practise the following steps to learn how to control your core muscles:
- 1Activate your upper abs
- 2Activate your lower abs
Your pelvis might tilt slightly backwards.
- 3Activate your obliques on both sides
You should feel tension around the sides of your abdomen.
- 4Activate your lower back
- 5Engage your whole core
Imagine a corset tightening around your waist without pulling your belly in.
- 6Squeeze the brace, if necessary
Imagine someone is about to punch you in the stomach. Your trunk should become noticeably firmer.
Learn one muscle at a time
If you struggle with a step, practise activating that muscle separately.
With practice, you'll be able to coordinate these muscles together without thinking about each one.
Three ways to brace
Once you understand the basic brace, you can apply it in three ways, depending on the exercise and how you need to breathe.
| Technique | Breathing | Tension | Best for |
|---|---|---|---|
| Valsalva | Hold your breath during effort | Squeeze | Short, heavy lifts like squats and deadlifts |
| Dynamic | Coordinate breathing with movement | Activation to squeeze | Repetitions like push-ups and dips |
| Static | Keep breathing during the hold | Activation to squeeze | Holds like planks and bridges |
Valsalva manoeuvre
The Valsalva manoeuvre involves holding your breath against a closed airway to increase trunk pressure and stability.
- 1Create a basic brace
- 2Hold your breath
Close your airway and maintain pressure. Your trunk should feel rigid and stable.
- 3Perform the movement while maintaining your brace
- 4Exhale and reset when appropriate
For heavy repetitions, you can reset your breath and brace between reps.
During very demanding efforts, your brace may approach near-maximal tension.
Best for short, heavy efforts
The Valsalva manoeuvre can help create substantial trunk stability, but it temporarily prevents normal breathing.
It's best suited to short, heavy efforts rather than prolonged holds or high-repetition sets.
Dynamic bracing
Dynamic bracing means maintaining your brace while breathing and moving.
It's useful for exercises like push-ups, dips and squats.
- 1Create a basic brace
- 2Maintain your brace throughout the movement
Keep your trunk stable as you move.
- 3Inhale during the eccentric phase
Maintain your brace as you breathe in.
- 4Exhale during the concentric phase
Breathe out without losing stability.
Repeat the breathing pattern for each repetition.
Match the brace to the intensity
The harder the exercise, the stronger your brace may need to be.
Use only as much tension as necessary to maintain stability. Excessive bracing creates unnecessary fatigue.
Static bracing
Static bracing means maintaining trunk stability while holding a position.
- 1Create a basic brace
- 2Get into position
Keep your trunk stable throughout the hold.
- 3Keep breathing
Breathe without losing your brace.
- 4Maintain your brace throughout the hold
Adjust your tension as needed to maintain stability.
Static doesn't mean maximum tension
Match your tension to the exercise and your goal.
Stronger bracing can make breathing more difficult and increase fatigue.
For example, an easy plank may only require activation or engagement, while a strength-focused plank may require a squeeze.
Recovery
Training gives your body a reason to adapt. Recovery is when that adaptation happens.
If you train again before you've recovered, your performance can drop and fatigue can start to build. Keep doing that, and eventually your progress may slow down.
There are many ways to judge how much recovery you need, from tracking sleep and readiness with apps to simply training by feel. Personally, I use a system based on one principle:
Simple principle
The harder you train, the more recovery you need.
To apply this, we need to understand two things:
In other words, intensity tells us how much fatigue we are likely to create. Fatigue tells us how much recovery we need before training hard again.
4 Levels of Intensity
In sports science, there are many ways to measure intensity, from RPE (Rate of Perceived Exertion) to percentages of 1RM for dynamic exercises and MVC (Maximum Voluntary Contraction) for isometric holds.
For this course, I use a simpler coaching model instead, to classify how demanding training is and how much recovery it is likely to require.
You can still use RPE, 1RM or MVC alongside it.
| Level | Repetitions | Holds | What it means |
|---|---|---|---|
| Intense | Failure within 1-8 reps | Failure under 10s | Maximal or near-maximal work with a large recovery demand |
| High | 1-3 reps left | Failure at 10-30s | Hard work with a significant recovery demand |
| Moderate | 4+ reps left | Hard at 30-60s | Challenging work with manageable fatigue |
| Easy | Barely demanding | Barely demanding | Light work with little fatigue |
Intense
For strength exercises, intense means taking a difficult 1 to 8 rep set to failure.
For holds, it means losing a difficult position in under 10 seconds.
What does failure mean?
Here, failure means technical failure, you stop because you're sure you couldn't complete another rep with good form.
Examples:
- A heavy squat or deadlift where another good rep is impossible.
- A 1RM bench press, squat, OHP or other compound lift.
- Weighted pull-ups or dips to failure.
- Bodyweight progressions taken to failure in the 1-8 rep range.
- A front lever, planche or iron cross lost in under 10 seconds.
- An all-out slow negative, like a pull-up or dip.
- Repeated all-out sprints until performance drops significantly.
Why only 1 to 8 reps?
This system is built around strength training, where the hardest sets are usually heavy and low-rep.
Higher-rep failure is more common in bodybuilding and endurance training. It can still create a lot of fatigue, so if a high-rep set leaves you unusually fatigued, count it as Intense.
High intensity
For compound and bodyweight exercises, high means stopping 1 to 3 reps short of failure.
It also includes lighter and high-rep sets, as well as isolation exercise taken to failure.
For holds, high means reaching failure between 10 and 30 seconds, or stopping a difficult hold 2 to 4 seconds before failure.
Examples:
- Squats or other compound exercises stopped 1 to 3 reps short of failure.
- High-rep bodyweight sets to failure, like 14+ push-ups.
- Isolation exercises to failure, like bicep curls.
- A tuck front lever stopped 2 to 4 seconds before failure.
- Controlled negatives close to failure.
- Loaded German hangs or skin the cats near the end of your range.
- End-range strength work close to failure, like Jefferson curls, good mornings or pike leg lifts.
- Accessory work to failure, like face pulls or shoulder rotations.
- Loaded stretching near your limit, like a challenging weighted pancake.
- Hard end-range isometrics.
- Hard HIIT, climbing or contact sports.
- Sprints, jumps and other explosive movements.
This is where most of your strength work should live.
Aim for 4 to 8 reps stopped 1 to 3 reps short of failure, or difficult strength holds of 10 to 30 seconds.
Intense work still has a place, but not often. Training to failure can be a useful tool when used sparingly, but it is not necessary for progress. If every set is Intense, recovery can take much longer.
I recommend taking only 1 or 2 sets to failure per workout.
Moderate intensity
For compound and bodyweight exercises, moderate means stopping with 4 or more good reps left.
For isolation and prehab exercises, it means stopping 1 to 3 reps short of failure.
For holds, moderate means the position becomes difficult around 30 to 60 seconds.
Examples:
- Pull-ups, deadlifts, squats or push-ups with 4 or more reps to spare.
- Isolation exercises with 1 to 3 reps left, like bicep curls.
- Prehab work with 1 to 3 reps left, like light face pulls or shoulder rotations.
- A plank that becomes difficult after 30 to 60 seconds.
- Light end-range strength work, like Jefferson curls or bodyweight Cossack squats.
- Comfortable loaded stretching, like a light weighted pancake.
- A steady run, bike or row where you can still hold a conversation.
- Easy climbing routes well below your limit.
- Casual games or recreational sports.
Good for beginners
Moderate work can still build strength and skill while creating much less fatigue.
It's ideal for beginners, learning new movements and deload weeks.
Easy intensity
Easy work barely feels demanding.
Examples:
- Warm-up sets.
- Mobility work, like hip or shoulder circles and controlled joint rotations.
- Technique practice, like band-assisted muscle-ups or empty-bar snatches.
- GTG (grease the groove): many easy sets spread throughout the day.
- Balance training, like easy handstand practice.
- Light accessory work, like shoulder rotations.
- Light stretching or yoga.
- Walking, easy hiking or relaxed cycling.
- Recreational swimming.
Easy work is almost free
Easy work adds very little fatigue as long as it stays easy.
You can often do it once or more per day. It's useful for practising skills and staying mobile without taking much away from recovery.
3 types of fatigue
Fatigue is a temporary reduction in your ability to perform. It builds over different time scales:
- Acute fatigue - builds within a workout.
- Residual fatigue - remains between workouts.
- Accumulated fatigue - builds across repeated workouts over days or weeks.
Each type of fatigue needs a different approach to recovery.
Acute fatigue
Acute fatigue builds during a workout. It develops within minutes and usually clears within minutes to hours.
What to do:
- Rest between sets - rest long enough to repeat the same quality on your next set.
- Do the hardest work first - skills and heavy strength work need you fresh.
- Order your training - start with a warm-up, some prehab work, then practise your skills/technique, move on to strength work, and finish with accessories, cardio and conditioning.
- Use failure carefully - failure creates a lot of fatigue. If you use it, do it on your first set, while you are fresh.
- Pair non-competing movements - alternating push and pull can save time while one muscle group rests.
Residual fatigue
Residual fatigue is what remains after the workout. You may feel sore or stiff. Your normal reps may also feel harder than usual. It can last from hours to multiple days.
What to do:
- Rest between workouts- a movement pattern often needs around 1-5 days before you train it again.
- Think in movement patterns - push-ups and dips both add pushing fatigue, so count them together.
- Rotate movement patterns - hard pulls on Monday do not necessarily stop you from training push or legs on Tuesday.
- Ease into new exercises - new movements often create more fatigue and soreness. Start conservatively and build gradually.
- Sleep and eat enough - both affect how well you recover between sessions. See sleep and nutrition.
Accumulated fatigue
Accumulated fatigue builds when fatigue from repeated workouts is not fully managed. It develops gradually across days and weeks. Signs can include:
- Your normal progression feels harder.
- Your reps keep dropping.
- Your technique gets worse.
- You feel unusually tired.
- Aches start appearing.
Look for patterns
One bad workout does not mean you have accumulated fatigue. Look for a pattern.
What to do:
Reduce training stress for a period of time.
The most common way to do this is a deload.
During a deload, you keep training but make it easier. You can reduce sets and reps, use easier progressions, stay further from failure.
How much rest?
Rest together with sleep is the simplest and most important recovery tool. It works on two time scales:
- The minutes between your sets - which clear acute fatigue.
- The days between your workouts - which clear residual fatigue.
Between sets
Rest long enough to repeat the same quality on your next set. Time depends on the intensity of the set.
| Intensity | Rest |
|---|---|
| Intense | 3 to 5 minutes |
| High | 1.5 to 3 minutes |
| Moderate | 30 to 90 seconds |
| Easy | 0 to 30 seconds |
These are just recommendations
Use these as a starting point, then find the rest time that works best for you.
Between workouts
Before you train a movement hard again, give it time to recover. How much depends on how many high and intense sets you did.
Only High and Intense sets count as hard sets.
Moderate, Easy and warm-up sets still create fatigue, but usually much less. For simplicity, we don't count them toward hard-set volume.
Also make sure to count them per movement pattern, not per exercise. For example, 3 sets of push-ups + 2 sets of dips = 5 hard sets of pushing.
| Sets | After High | After Intense |
|---|---|---|
| 1-2 | 1 day | 1-2 days |
| 3-4 | 1 day | 2-3 days |
| 5-8 | 1-2 days | 3-4 days |
| 9+ | 2-3 days | 4+ days |
Moderate sets need 0 to 1 days of rest, and easy sets need none.
Mixed levels?
Check each level on its own, then go with the longer rest.
For example, 3 high sets and 3 intense sets of pulling means 1 day for the high sets and 2-3 days for the intense one, so rest 2-3 days.
Practical recovery guideline
These recovery times are not fixed by science. They are starting points for beginners.
Adjust them based on your performance, soreness, fatigue, the movement you trained and how quickly you personally recover.
What is deload?
A deload is a planned easier period, usually about a week or single workout, that lets accumulated fatigue clear while you keep training.
How to deload
There are several ways to lower training stress. Pick one, or combine them:
- Skip the hard exercises - drop your hard sets, but keep accessory work, mobility and light conditioning. This is my preferred option, because it's the simplest and leaves nothing to guess.
- Lower the intensity - keep your exercises, but make every set moderate. With weights, reduce the load. With bodyweight exercises, use an easier variation.
- Train less often - keep your workouts the same, but do fewer sessions that week.
- Take a full break - rest completely for a few days. This is useful when you're ill, travelling or very stressed.
- Deload every hard set - for beginners, if you choose to lower intensity, I recommend deloading everything rather than trying to identify exactly where the fatigue is coming from.
What about just reducing volume?
Fewer sets help, but the remaining sets can still be very demanding if you take them close to failure.
So, lower the intensity first. If you still need more recovery, reduce the volume too.
There are three common ways to decide when to deload.
Fixed deload
You schedule one in advance, such as every 4 to 8 weeks. It's simple, but the timing may not match your actual fatigue.
Training by feel
You decide based on how recovered you feel. It's the opposite of a fixed deload, instead of following a calendar, you follow your feelings.
The problem is that feelings and performance don't always match. Mood, stress and motivation can all change how you feel.
You might wake up feeling tired and still have a great workout. Or you might feel fine while fatigue quietly builds up.
Autoregulation
You adjust your training based on your performance. A simple method is to use your first working set as a check:
- Same or better - train as planned.
- Clearly worse - make the session easier.
- Clearly worse for two sessions in a row - take a deload week.
This is the recommended method
It's based on how you actually perform, not a calendar or a feeling, and it catches fatigue early.
Pain is different
Pain is not normal fatigue. If an exercise causes joint pain or unusual pain, reduce it, modify it or stop it. Don't wait for a deload week to deal with it. See what if I feel pain.
Sleep
Sleep is when most of your recovery happens. It's when your body repairs and adapts to training.
Most adults need 7 to 9 hours a night. If you train hard, aim for the upper end.
Too little sleep makes your workouts feel heavier, lowers your strength and raises your injury risk. One bad night is fine, but a week of short nights isn't.
Slept badly?
Don't guess whether to train. Start with your first working set. If it's the same or better than last time, train as planned. If it's worse, go easier today.
Tracking
If you do not track your training, you are guessing. Write down each exercise, and for it the sets, reps, and hold times you managed.
This matters because progression depends on it. The whole system is simple: beat your previous numbers over time. You cannot beat a number you never wrote down.
Keep it simple
A notebook or a notes app is enough. You do not need a fancy tool, just a record you can look back on.
Mobility
Besides conditioning, mobility is the second most important thing in calisthenics. If you don't have enough range of motion, you may not be able to perform an exercise properly. And if you try to perform it anyway, you may use compensations that can lead to injury.
So understanding how to train mobility is crucial.
Range of motion
Strength training is straightforward. You lift more weight, and you get stronger. Mobility, on the other hand, is more complex than that.
This video goes into more detail.
Programming
A good starting point for mobility training is 2-3 sets per exercise at moderate or high intensity, using an 8-12 rep range. For holds, use 10-30 seconds if the exercise is hard, or 30-60 seconds if it is moderate. Train mobility 3-4 times per week.
People respond to mobility training very differently, so adjust it to your current range of motion, the exercise, the load and your goal.
Weight loss
Most people who get into calisthenics also want to lose weight. There is nothing wrong with that, but understand that losing weight and building skills are two different goals.
You can pursue both at once, but training is not the main driver of fat loss - your diet is. Calisthenics builds and maintains muscle, while a calorie deficit is what actually reduces bodyweight.
Nutrition
I am not going to give you a diet plan, but a few basics go a long way:
- Calorie deficit - to lose fat, you have to eat fewer calories than you burn. This is the one thing that actually drives weight loss.
- Protein - eat enough protein while in a deficit. It helps you keep muscle and recover from training. A common target is around 1.6 to 2.2 g per kg of bodyweight.
- Whole foods - build most of your meals around minimally processed foods. They keep you fuller and make a deficit easier to sustain.
- Recovery - your results are capped by your nutrition and sleep. You cannot out-train a poor diet.
One goal at a time
If you are very overweight, prioritise the calorie deficit and basic conditioning first. If your main goal is a specific skill, make sure you are eating enough to recover and progress.
Equipment
Technically you do not need any equipment for calisthenics. Still, the right gear can make a big difference.
Pull-up equipment options
Pull-ups are a foundational exercise, so it helps to have a way to perform them. There are many options, from simple pull-up bars to full stations.
This video explains the main pros and cons of each.
Low-bar options
Low bars, sometimes called parallel bars, and most commonly known as parallettes, are great to have.
They let you train without putting excessive strain on your wrists, and they open up a wide range of exercises like push-ups, L-sits, handstands, and planche work.
You can still train most of these on the floor, but parallettes make them more comfortable and often more effective.
FAQ
Common questions about applying these principles to your own training.
Do I need to understand all of this before I start?
Not really. You can start training without knowing most of this and pick it up as you go.
It becomes useful if you want to create your own program, or if you want to understand the reasoning behind mine. This is the exact information I use when I put my own programs together.
Should I train to failure?
You can, but not often. Training to failure can be a useful tool when used sparingly, but it is not necessary for progress.
My recommendation
Take 1 or 2 sets per workout to failure, and keep the rest of your sets at high intensity, stopping 1 to 3 reps short of failure.
Do your failure sets first, while you are fresh and able to produce the most force with good technique.
Can I train every day?
Yes, but not hard every day.
Easy work, like mobility, technique practice or balance training, can be done daily. Hard sets for the same movement pattern need rest days in between, see how much rest.
You can train different movement patterns on back-to-back days, for example pull on Monday and push on Tuesday.
Can I train if I am still sore?
Yes, but avoid hard training for the movement pattern that is sore. Soreness can be a sign of residual fatigue, so that pattern may not be fully recovered yet.
For example, if your back is sore from pull-ups, you can still train push, legs or core, but skip hard pulling until the soreness has mostly gone.
Easy work, such as mobility, is usually fine either way.
Sharp pain or joint pain is different. See what if I feel pain.
Do I have to remember all these levels?
No, you don't have to.
The problem is that the fitness community uses different words to describe the same things, and they often don't match. One coach's engage is another coach's squeeze.
These levels are my attempt to standardise the terms I use in this course. So when I say "Engage the muscle", it is clear that I mean moderate tension, around 30-60% of MVC.
Of course, in practice this is very hard to measure, and your effort will rarely match the numbers exactly. Treat the levels as a shared vocabulary, not a precise measurement.
Am I doing too much?
If your performance drops during workouts, if you feel constantly fatigued, or if your joints start to hurt, you are probably doing too much.
Calisthenics is not bodybuilding, where following a strict schedule is the priority. What matters more is how well you manage the stress you place on your body.
If you ignore recovery and keep pushing, you raise the risk of overuse injuries, especially in tendons and connective tissue.
It is okay to skip workouts
If something feels off, do not train, even if it breaks your schedule. This is one of the most important rules to follow.
For more detailed information about rest, see recovery.
Do I need a deload if I feel fine?
Not necessarily. Feelings and performance don't always match, so this course recommends autoregulation instead of a fixed schedule.
If your first working set is clearly worse than last time, deload that session. If your performance keeps improving, keep training.
What if I miss a workout?
Just continue with your next planned workout. Don't try to make it up by doubling your volume.
Missing a session now and then won't affect your progress. Consistency over weeks matters more than any single workout.
If you miss a week or more, start slightly easier and build back up.
Can I skip exercises?
Yes, with some exceptions:
- For strength-based exercises, make sure your program covers all movement patterns.
- For mobility, make sure you cover all the joints in the body.
If you remove an exercise, replace it with another that trains the same function, so your program stays balanced.
If you're considering skipping an exercise because of fatigue, see the deload.
What if I feel pain?
- 1Stop provoking it - immediately
Stop the set if the pain is sharp, sudden, increasing, or makes the area feel weak or unstable.
- 2Reduce the aggravating load - until symptoms settle
Reduce or temporarily remove the movement, load or range that clearly aggravates the area.
Continue normal movement and pain-free training where comfortable.
- 3Reassess - over the next few days and sessions
Pay attention to how the area responds during activity, afterwards and the following day.
- 0–2/10 and stable: continue with a reduced load.
- 3–4/10 or worse afterwards: reduce the load, range of motion or difficulty.
- 5+/10, sharp pain or progressively worsening symptoms: stop that movement and consider getting it assessed.
- 4Rebuild capacity - days to months
Start with a variation or load that you can tolerate without significantly worsening symptoms.
A practical starting point is at moderate intensity.
- 5Progress gradually - as tolerance improves
If symptoms remain stable or improve between sessions, increase one variable at a time:
- load
- repetitions
- sets
- range of motion
- exercise difficulty
- 6Reintroduce the original movement once you can tolerate it
Gradually restore the original movement, then build back towards your previous load, volume and range of motion.
Enjoying the course?
This course is free and has no ads. If it helped you, you can support it with a coffee.
(opens in a new tab)